
API quickstart
Your first connection.
A key, a base URL and a model ID. Use the same three values in your app or code.
1. Create a key
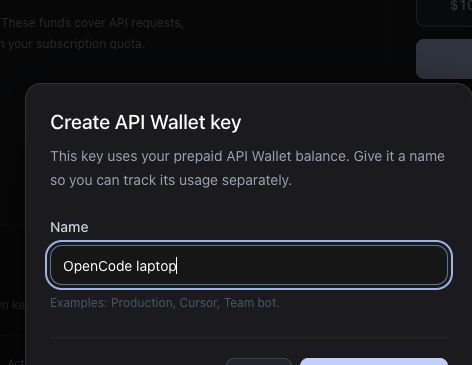
Open API Wallet & keys. For a Wallet key, choose a funding amount and complete checkout when available. Once your paid balance is positive, select Create API key and give it a name, such as “OpenCode laptop”. Copy the key when it appears; its full value is shown only once.
Wallet keys are available independently of a Plus, Pro or Builder subscription and use the prepaid API balance. Builder also offers a separate key type that uses subscription quota. For an active Builder subscription, select Builder keys and create a key without funding the Wallet. Select the key type you intend to use.
Lost the secret? Revoke that key and create a replacement. Revoking a key blocks new requests using it.
Where to find the settings
In the API page, your Wallet balance is at the top, API keys are below it, and Connect your app contains the Base URL.
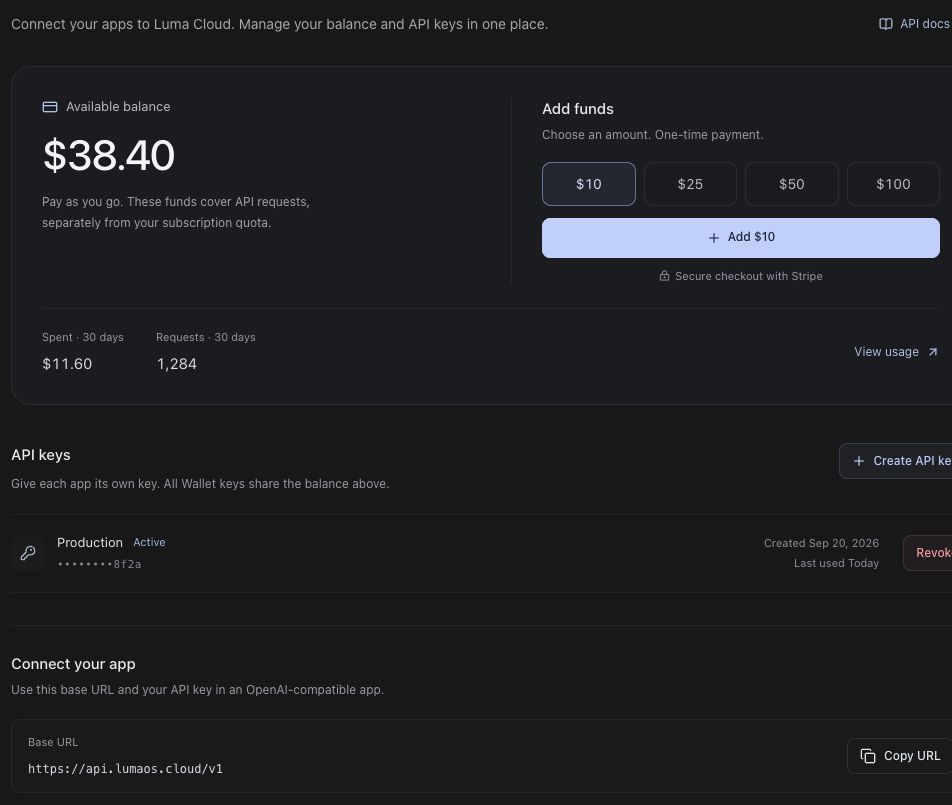
Select Create API key, enter a useful name, then select Create Wallet key. Save the secret shown next in your client’s secure field. The name helps you identify the app later; it is not the secret.
2. Keep your key private
For a desktop client, enter the key in its API-key field or secret store. An environment-variable name typed into a password field is not the key itself; substitution works only where the client documents it.
For terminal examples, set the variables below. The first command waits for you to enter your key without echoing it. The variables apply to the current terminal; GUI apps may not inherit them.
# macOS / Linux: enter the key when prompted, not in the command itself.
read -r -s LUMA_CLOUD_API_KEY
export LUMA_CLOUD_API_KEY
export LUMA_CLOUD_BASE_URL="https://api.lumaos.cloud/v1"
# Replace the value below with an ID returned for your key.
export LUMA_CLOUD_MODEL="MODEL_ID_FROM_CATALOG"
Windows PowerShell 7
$env:LUMA_CLOUD_API_KEY = Read-Host "Luma Cloud API key" -MaskInput
$env:LUMA_CLOUD_BASE_URL = "https://api.lumaos.cloud/v1"
$env:LUMA_CLOUD_MODEL = "MODEL_ID_FROM_CATALOG"
Never put the key in a repository, screenshot, shared document or frontend JavaScript. Use a local secret manager or an ignored environment file for persistent setup.
3. Choose an available model
Request the model list with the same key that your app will use:
curl --fail-with-body "https://api.lumaos.cloud/v1/models" \
  -H "Authorization: Bearer $LUMA_CLOUD_API_KEY"
Copy an exact id from data in the response. Replace MODEL_ID_FROM_CATALOG with it. If your client needs a manually maintained model list, add that ID there too. A model mentioned in an example is not a promise that your key can use it.
4. Connect your app
- Provider
- OpenAI Compatible / Custom OpenAI
- Base URL
https://api.lumaos.cloud/v1- API key
- The key you created in the API dashboard
- Model
- An exact ID returned by
/models
Use the base URL ending in /v1, not a full completion URL, unless the client explicitly asks for an endpoint. Follow the guide for your client for any URL-format exceptions.
5. Make one short request
For a terminal check, use the example below. A completed model request uses funds or subscription quota.
curl --fail-with-body -N "https://api.lumaos.cloud/v1/chat/completions" \
  -H "Authorization: Bearer $LUMA_CLOUD_API_KEY" \
  -H "Content-Type: application/json" \
  --data @- <<JSON
{
  "model": "$LUMA_CLOUD_MODEL",
  "messages": [{"role": "user", "content": "Reply with hello."}],
  "stream": true
}
JSON
Windows PowerShell 7: model list and first response
After setting the private variables above, run this example. It lists models, asks which ID to use, then makes one request.
$headers = @{ Authorization = "Bearer $env:LUMA_CLOUD_API_KEY" }
$models = Invoke-RestMethod "$env:LUMA_CLOUD_BASE_URL/models" -Headers $headers
$models.data | Select-Object id

$env:LUMA_CLOUD_MODEL = Read-Host "Model ID from the list above"
$body = @{
  model = $env:LUMA_CLOUD_MODEL
  messages = @(@{ role = "user"; content = "Reply with hello." })
  stream = $false
} | ConvertTo-Json -Depth 5
$result = Invoke-RestMethod "$env:LUMA_CLOUD_BASE_URL/chat/completions" -Method Post -Headers $headers -ContentType "application/json" -Body $body
$result.choices[0].message.content
You should receive text events and a completed stream. Then check Usage → API Wallet for a Wallet key, or subscription Usage for a Builder key. For an agent, next try a small read-only task in a test folder before permitting edits or shell commands.
Receiving 401, 402 or 429? Use the error guide.